使用版本:
libdispatch-1173.40.5.tar
涉及到的数据结构在我的另一篇 其他:数据结构源码解析
本篇还是我对函数源码的逐步探究, 核心内容在正文中: 正文: 以 GCD 的接口为引, 看源码实现
dispatch_sync
整个执行力流程嵌套了很多层的函数, 会根据串行并行, 队列的状态(是否执行中, 是否满并发), 目标队列是否嵌套等经历很多的分支
最终, 调用 work 的函数, 整个流程可以描述为: 不断判断分支, 最终执行函数的过程
推测, `dispatch_sync` 最终是在当前线程中执行一个函数
(dispatch到主线程有优化, 但是对应代码我没找到)
执行流程追溯如下:
串行 dq->dq_width == 1
dispatch_sync_dispatch_sync_f_dispatch_sync_f_inline- 从这一步开始, 并发和串行有了区分
_dispatch_barrier_sync_f _dispatch_barrier_sync_f_inline_dispatch_lane_barrier_sync_invoke_and_complete_dispatch_sync_function_invoke_inline- 并发和串行最终调用的函数是一致的
_dispatch_client_callout
并发 dq->dq_width > 1
dispatch_sync_dispatch_sync_f_dispatch_sync_f_inline- 并发队列, 在上一步不需要有带
barrier的流程, 而是直接执行入参,_dispatch_sync_invoke_and_complete _dispatch_sync_function_invoke_inline_dispatch_client_callout
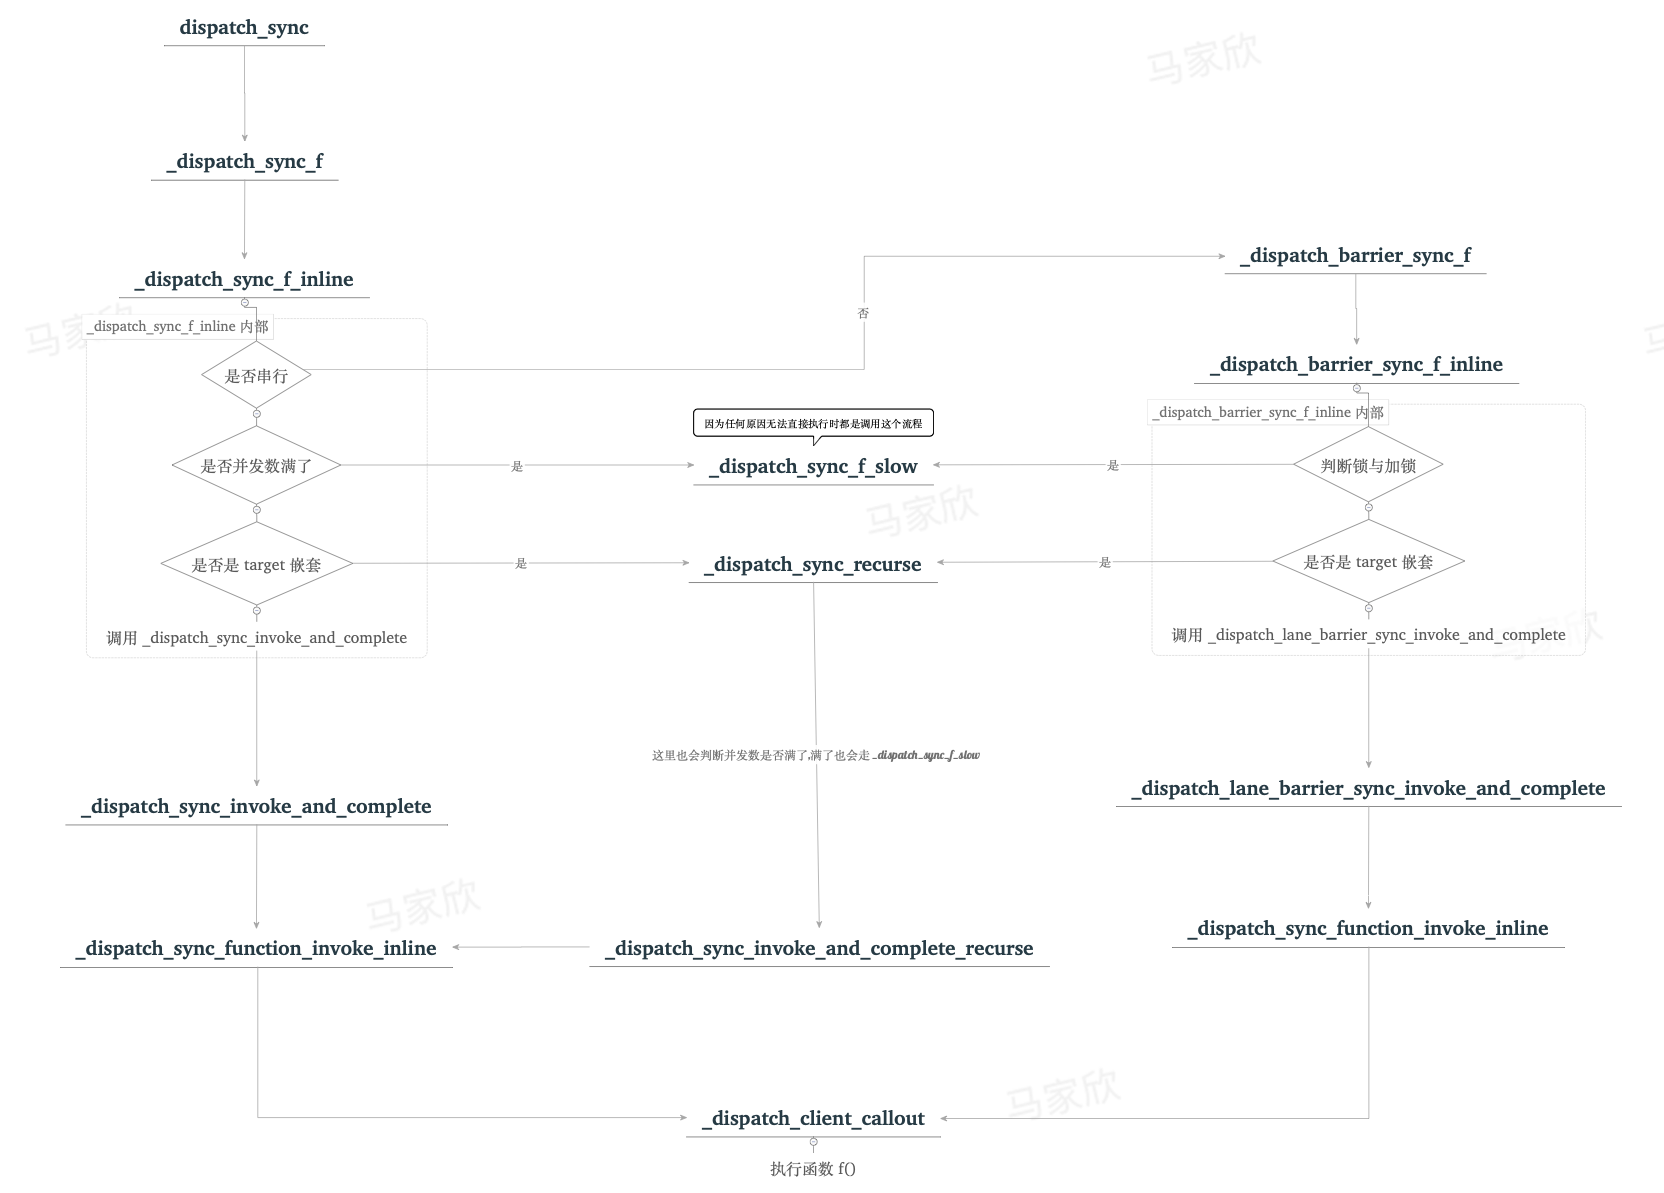
1,2,3 嵌套部分略过, 直接从 _dispatch_sync_f_inline 开始
可以看到, 第一个判断就是决定分支走向的点, 判断条件是并发数量
- 若并发数为 1, 执行
_dispatch_barrier_sync_f - 若并发数已爆, 执行
_dispatch_sync_f_slow - 其余情况, 执行
_dispatch_sync_invoke_and_complete
static inline void _dispatch_sync_f_inline(dispatch_queue_t dq, void *ctxt, dispatch_function_t func, uintptr_t dc_flags) {
  if (likely(dq->dq_width == 1)) { return _dispatch_barrier_sync_f(dq, ctxt, func, dc_flags); }
  if (unlikely(dx_metatype(dq) != _DISPATCH_LANE_TYPE))
    DISPATCH_CLIENT_CRASH(0, "Queue type doesn't support dispatch_sync");

  dispatch_lane_t dl = upcast(dq)._dl;
	//判断并发数是否已满
  if (unlikely(!_dispatch_queue_try_reserve_sync_width(dl))) {
    return _dispatch_sync_f_slow(dl, ctxt, func, 0, dl, dc_flags);
  }
	//判断是否 target 嵌套
  if (unlikely(dq->do_targetq->do_targetq)) {
    return _dispatch_sync_recurse(dl, ctxt, func, dc_flags);
  }
  _dispatch_introspection_sync_begin(dl);
	//执行函数
  _dispatch_sync_invoke_and_complete(dl, ctxt, func DISPATCH_TRACE_ARG(
      _dispatch_trace_item_sync_push_pop(dq, ctxt, func, dc_flags)));
}
_dispatch_sync_invoke_and_complete 是调用函数并执行, 不展开, 和下面串行最后的执行基本一致
_dispatch_barrier_sync_f -> _dispatch_barrier_sync_f_inline
先是一层嵌套, 然后才真正的进入执行部分
前半部分, 没看懂, 看参考文章是做获取状态和加锁, 如果失败就走 slow 流程
_dispatch_lane_barrier_sync_invoke_and_complete 是真正的执行函数
static inline void
_dispatch_barrier_sync_f_inline(dispatch_queue_t dq, void *ctxt,
    dispatch_function_t func, uintptr_t dc_flags){
  if (unlikely(!_dispatch_queue_try_acquire_barrier_sync(dl, tid))) {
    return _dispatch_sync_f_slow(dl, ctxt, func, DC_FLAG_BARRIER, dl, DC_FLAG_BARRIER | dc_flags);
  }

  if (unlikely(dl->do_targetq->do_targetq)) {
    return _dispatch_sync_recurse(dl, ctxt, func, DC_FLAG_BARRIER | dc_flags);
  }

  _dispatch_introspection_sync_begin(dl);
  _dispatch_lane_barrier_sync_invoke_and_complete(dl, ctxt, func
      DISPATCH_TRACE_ARG(_dispatch_trace_item_sync_push_pop(
          dq, ctxt, func, dc_flags | DC_FLAG_BARRIER)));
}
_dispatch_lane_barrier_sync_invoke_and_complete 中调用 _dispatch_sync_function_invoke_inline
static void
_dispatch_lane_barrier_sync_invoke_and_complete(dispatch_lane_t dq,
    void *ctxt, dispatch_function_t func DISPATCH_TRACE_ARG(void *dc)) {
  _dispatch_sync_function_invoke_inline(dq, ctxt, func);
	//...省略了大部分代码
}
_dispatch_sync_function_invoke_inline 执行_dispatch_client_callout 最终实现函数调用, 看那个 f 就是
static inline void
_dispatch_sync_function_invoke_inline(dispatch_queue_class_t dq, void *ctxt,
    dispatch_function_t func)
{
  dispatch_thread_frame_s dtf;
  _dispatch_thread_frame_push(&dtf, dq);
  _dispatch_client_callout(ctxt, func);
  _dispatch_perfmon_workitem_inc();
  _dispatch_thread_frame_pop(&dtf);
}
void _dispatch_client_callout(void *ctxt, dispatch_function_t f) {
  f(ctxt);
}
dispatch_async
这个函数看其他参考文章, 在早期版本中很复杂. 但是我看的版本里面很简单(但是层层递进追的我吐血)
dispatch_continuation_t 之前在数据结构中提到过, 我们 dispatch 的函数,block 最终都会被封装成这个结构
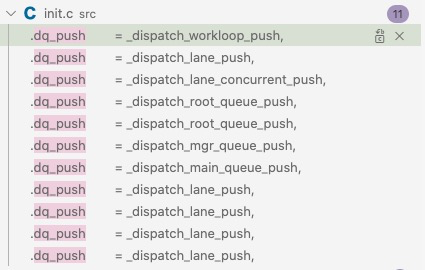
_dispatch_continuation_init中将work封装起来_dispatch_continuation_async最终执行的是dx_push
记得数据结构中提到的 v_table 虚函数表吗,#define dx_push(x, y, z) dx_vtable(x)->dq_push(x, y, z)
最终执行的就是虚函数表中被设置的函数, 设置的地方往下看
这一步可以总结为: 封装block, 并调用 push 函数
void dispatch_async(dispatch_queue_t dq, dispatch_block_t work)
{
  dispatch_continuation_t dc = _dispatch_continuation_alloc();
  uintptr_t dc_flags = DC_FLAG_CONSUME;
  dispatch_qos_t qos;

  qos = _dispatch_continuation_init(dc, dq, work, 0, dc_flags);
  _dispatch_continuation_async(dq, dc, qos, dc->dc_flags);
}

#define dx_push(x, y, z) dx_vtable(x)->dq_push(x, y, z)
static inline void _dispatch_continuation_async(dispatch_queue_class_t dqu,
    dispatch_continuation_t dc, dispatch_qos_t qos, uintptr_t dc_flags){
// .. 省略一些代码
  return dx_push(dqu._dq, dc, qos);
}
dq_push 不同对内有不同的实现, 这里找个名字熟悉的 _dispatch_main_queue_push
核心部分在 _dispatch_queue_push_item 和 dx_wakeup 这两函数
_dispatch_queue_push_item 一路追下去, 最后是个链表加节点的操作
_dispatch_queue_push_item -> os_mpsc_push_item -> os_mpsc_push_list 就是往链表最后一个节点加元素.
之后可以看到, push 函数中会视情况调用 wakeup
所以 push 操作可以总结为: 往链表尾部加个元素, 并根据需要唤醒线程
void _dispatch_main_queue_push(dispatch_queue_main_t dq, dispatch_object_t dou,
    dispatch_qos_t qos){
  // Same as _dispatch_lane_push() but without the refcounting due to being
  // a global object
  if (_dispatch_queue_push_item(dq, dou)) {
    return dx_wakeup(dq, qos, DISPATCH_WAKEUP_MAKE_DIRTY);
  }

  qos = _dispatch_queue_push_qos(dq, qos);
  if (_dispatch_queue_need_override(dq, qos)) {
    return dx_wakeup(dq, qos, 0);
  }
}
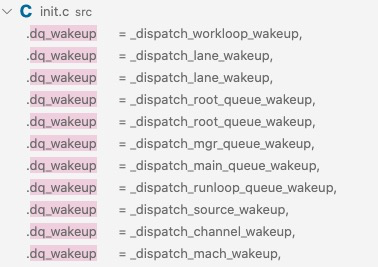
再看 wakeup:
#define dx_wakeup(x, y, z) dx_vtable(x)->dq_wakeup(x, y, z)
同样的, 调用 v_table 中的函数, 只能用搜索功能找
push 到队列后, 之后的调度到了系统底层, 这一层我目前还没追溯. 只能根据参考文章, 找到调用到_dispatch_worker_thread2 开始执行流程
_dispatch_worker_thread2 内部的核心是调用dispatch_root_queue_drain 在这里面,正式开始出队操作
_dispatch_root_queue_drain_one 函数里面是链表的节点操作, 记得数据结构中我们提到GCD 中基本元素都是链表的节点吗?
就是在这里使用的 其他: GCD 数据结构 源码解析
  while (likely(item = _dispatch_root_queue_drain_one(dq))) {
    if (reset) _dispatch_wqthread_override_reset();
    _dispatch_continuation_pop_inline(item, &dic, flags, dq);
    reset = _dispatch_reset_basepri_override();
    if (unlikely(_dispatch_queue_drain_should_narrow(&dic))) {
      break;
    }
  }